fun multiply(a: Int, b: Int): Int {
    return a * b
}

fun divide(a: Int, b: Int): Int {
    if (b == 0) {
        println("0으로 나눌 수 없습니다.")
        return 0  // 또는 적절한 예외 처리를 할 수 있음
    }
    return a / b
}

fun main() {
    println("곱셈 결과: ${multiply(10, 5)}")    // 출력: 50
    println("나눗셈 결과: ${divide(10, 2)}")    // 출력: 5
    println("나눗셈 결과: ${divide(10, 0)}")    // 출력: 0과 "0으로 나눌 수 없습니다." 메시지
}
2. 학생 성적 평균 구하기
- 문제 설명 : 학생들의 성적이 저장된 리스트가 주어질 때, 모든 학생의 평균 성적을 계산하여 출력하는 코드를 작성해보자
- 힌트 : 가변 리스트 또는 불변 리스트를 사용하여 성적 데이터를 저장한다. 리스트의 모든 요소를 합산한 후, 리스트의 크기로 나눈다.
fun calculateAverage(scores: List<Int>): Double {
    var sum = 0
    for (score in scores) {
        sum += score
    }
    return sum.toDouble() / scores.size
}

fun main() {
    val scores = listOf(80, 90, 100, 70, 60)
    println("평균 성적: ${calculateAverage(scores)}") // 출력: 평균 성적: 80.0
}
3. 짝수만 출력
- 문제 설명 : 정수 리스트가 주어졌을 때, 리스트에서 짝수인 숫자만 출력하는 코드를 작성해보자
fun findMax(arr: Array<Int>): Int {
    var max = arr[0]
    for (num in arr) {
        if (num > max) {
            max = num
        }
    }
    return max
}

fun main() {
    val numbers = arrayOf(10, 20, 30, 40, 50)
    println("최대값: ${findMax(numbers)}")
}
* 관련해서 더 알아보아야 하는 것 : Docker를 이용해 여러 개의 Spring Boot 컨테이너를 실행하고, Kubernetes를 사용하여 Auto Scaling 기능을 적용하는 방법을 찾아보자.
3-2. 부하 분산(Load Balancing)
부하 분산은 사용자 요청을 여러 서버에 골고루 분산시켜 한 서버에 부담이 집중되지 않도록 하는 기술이다. 음식점에서 한 웨이터가 모든 손님을 상대하기 어려우니, 여러 웨이터가 각 테이블을 나누어 케어하는 것과 같다.
Spring Boot 애플리케이션은 외부 로드 밸런서(Nginx, HAProxy, AWS ELB 등)와 함께 사용하여 부하 분산을 쉽게 구현할 수 있다.
직접 로드 밸런싱 코드를 작성하는게 아니라 로드 밸런서 설정 파일을 통해 서버 간 트래픽 분산을 관리한다.
Nginx 설정 일부 예시 :
upstream spring_backend {
    server 192.168.1.101:8080;
    server 192.168.1.102:8080;
    server 192.168.1.103:8080;
}

server {
    listen 80;
    server_name yourdomain.com;

    location / {
        proxy_pass http://spring_backend;
        proxy_set_header Host $host;
        proxy_set_header X-Real-IP $remote_addr;
    }
}
3-3. 캐싱(Caching)
캐싱은 자주 사용되는 데이터를 미리 저장해 두어, 데이터베이스나 다른 서버에 매번 접근하지 않고 빠르게 응답하는 기술이다. 냉장고에 좋아하는 간식을 미리 저장해두면, 매번 마트에 가지 않고도 간식을 즐길 수 있는 걸 생각하면 비슷하다.
Spring Boot는 Redis와 같은 캐시 솔루션과 쉽게 통합할 수 있다.
Redis 캐시 설정 및 사용 예시 : 1. build.gradle.kts에 Redis 의존성 추가
dependencies {
    implementation("org.springframework.boot:spring-boot-starter-data-redis")
    // ... 기타 의존성
}
2. applicaiton.properties에 Redis 설정 추가
# Redis 서버 설정 (로컬에서 Redis가 실행 중임을 가정합니다)
spring.redis.host=localhost
spring.redis.port=6379

# 기본 서버 포트 (8080번 포트로 실행)
server.port=8080
3. Kotlin 코드 예제 - 캐시 서비스 구현
CacheService.kt
package com.example.demo.service

import org.springframework.beans.factory.annotation.Autowired
import org.springframework.data.redis.core.RedisTemplate
import org.springframework.stereotype.Service
import java.util.concurrent.TimeUnit

/**
 * CacheService 클래스는 Redis를 이용하여 캐시 기능을 제공하는 서비스이다.
 * 이 클래스에서는 데이터를 캐시에 저장(setCache)하고, 조회(getCache)하는 기능을 구현한다.
 */
@Service
class CacheService(@Autowired val redisTemplate: RedisTemplate<String, String>) {

    /**
     * setCache 함수는 지정된 key와 value를 캐시에 저장합니다.
     * timeout은 캐시에 데이터가 유지될 시간(초)입니다.
     */
    fun setCache(key: String, value: String, timeout: Long = 60) {
        // opsForValue()는 단순한 key-value 캐싱에 사용됩니다.
        redisTemplate.opsForValue().set(key, value, timeout, TimeUnit.SECONDS)
    }

    /**
     * getCache 함수는 지정된 key에 해당하는 캐시된 값을 반환합니다.
     * 만약 캐시에 값이 없으면 null을 반환합니다.
     */
    fun getCache(key: String): String? {
        return redisTemplate.opsForValue().get(key)
    }
}
AsyncService.kt
package com.example.demo.service

import org.springframework.scheduling.annotation.Async
import org.springframework.stereotype.Service

/**
 * AsyncService 클래스는 비동기 작업을 처리하기 위한 서비스이다.
 * @Async 어노테이션을 사용하여, 이 클래스의 메서드가 호출될 때 즉시 반환되고,
 * 별도의 스레드에서 작업을 수행하게 된다.
 */
@Service
class AsyncService {

    /**
     * doAsyncWork 함수는 3초 동안 대기한 후 "비동기 작업 완료!" 메시지를 콘솔에 출력한다.
     * 이 함수는 @Async 어노테이션 덕분에 호출 즉시 비동기적으로 실행된다.
     */
    @Async
    fun doAsyncWork() {
        // 3초간 대기하여, 긴 작업을 비동기적으로 처리하는 예제를 시뮬레이션한다.
        Thread.sleep(3000)
        println("비동기 작업 완료!")
    }
}
DemoController.kt
package com.example.demo.controller

import com.example.demo.service.AsyncService
import com.example.demo.service.CacheService
import org.springframework.web.bind.annotation.GetMapping
import org.springframework.web.bind.annotation.RestController

/**
 * DemoController는 REST API를 제공하는 컨트롤러이다.
 * 이 컨트롤러는 캐시 기능과 비동기 작업 기능을 테스트하기 위한 API를 제공한다.
 */
@RestController
class DemoController(
    val cacheService: CacheService,  // CacheService를 주입받아 캐시 기능을 사용한다.
    val asyncService: AsyncService   // AsyncService를 주입받아 비동기 작업을 수행한다.
) {

    /**
     * /ping API는 캐시에서 "greeting" 키의 값을 조회하고,
     * 값이 없다면 "pong"을 캐시에 저장한다.
     * 동시에 비동기 작업을 실행하고, "pong"을 응답한다.
     */
    @GetMapping("/ping")
    fun ping(): String {
        val key = "greeting"
        // 캐시에서 key "greeting"의 값을 가져온다.
        var value = cacheService.getCache(key)
        // 만약 캐시에 값이 없으면,
        if (value == null) {
            value = "pong"
            // 캐시에 60초 동안 "pong" 값을 저장한다.
            cacheService.setCache(key, value, 60)
        }
        // 비동기 작업을 실행한다.
        // 이 작업은 백그라운드에서 3초 후 완료된다.
        asyncService.doAsyncWork()
        // "pong"을 응답으로 반환한다.
        return value
    }
}
3-4. 비동기 처리와 큐
사용자의 요청을 즉시 처리하지 않고, 큐에 저장한 후 차례대로 처리하는 방식이다. (인터파크에서 앞에 몇명이 남았다고 알려주는게 큐를 사용해서 그런게 아닐까?) 놀이공원에서 사람들이 대기열에 서 있다가 순서대로 놀이기구를 타는 것처럼, 요청을들 순차적으로 처리한다.
@Async 어노테이션을 사용하면 쉽게 비동기 작업을 구현할 수 있다.
간단한 예제를 보면
// AsyncService.kt
package com.example.demo.service

import org.springframework.scheduling.annotation.Async
import org.springframework.stereotype.Service

/**
 * AsyncService는 긴 작업을 비동기적으로 처리하는 서비스이다.
 * @Async 어노테이션을 사용하여, 이 메서드가 호출되면 별도의 스레드에서 실행된다.
 */
@Service
class AsyncService {

    /**
     * doAsyncWork 함수는 3초간 대기 후 콘솔에 "비동기 작업 완료!" 메시지를 출력한다.
     */
    @Async
    fun doAsyncWork() {
        // 3000 밀리초 (3초) 동안 대기한다.
        Thread.sleep(3000)
        println("비동기 작업 완료!")
    }
}
비동기에 대해서 감이 안올수 있다. Controller에서 비동기를 호출 후 처리하는 간단한 예제를 살펴보자
// DemoController.kt
package com.example.demo.controller

import com.example.demo.service.AsyncService
import org.springframework.web.bind.annotation.GetMapping
import org.springframework.web.bind.annotation.RestController

/**
 * DemoController는 간단한 REST API를 제공하여, 비동기 작업을 테스트할 수 있게 한다.
 */
@RestController
class DemoController(val asyncService: AsyncService) {

    /**
     * /asyncTest 경로를 호출하면, 비동기 작업이 실행되고 즉시 응답을 반환
     */
    @GetMapping("/asyncTest")
    fun asyncTest(): String {
        asyncService.doAsyncWork()  // 비동기 작업 실행
        return "비동기 작업이 시작되었습니다!"
    }
}
위 코드가 어떻게 동작할까? 사용자가 /asyncTest API를 호출하면, 서버는 즉시 "비동기 작업이 시작되었습니다!" 라는 응답을 반환하고, 백그라운드에서 3초 후 "비동기 작업 완료!" 메세지를 콘솔에 출력한다. 순서대로 실행되는게 아니다.
Spring Boot와 Kotlin에서 간단한 메시지 큐를 구현해보자(RabbitMQ 사용)
1. build.gradle.kts에 의존성 추가
dependencies {
    // RabbitMQ와 Spring Boot 연동을 위한 의존성
    implementation("org.springframework.boot:spring-boot-starter-amqp")
    // 기타 의존성...
}
2. application.properties에 RabbitMQ 설정
# RabbitMQ 서버 설정 (기본적으로 로컬에서 실행 중이라고 가정)
spring.rabbitmq.host=localhost
spring.rabbitmq.port=5672
메세지 큐 서비스 구현
// MessageQueueService.kt
package com.example.demo.service

import org.springframework.amqp.rabbit.annotation.RabbitListener
import org.springframework.amqp.rabbit.core.RabbitTemplate
import org.springframework.stereotype.Service

/**
 * MessageQueueService는 RabbitMQ를 사용하여 메시지 큐를 통한 비동기 처리를 구현한 서비스
 */
@Service
class MessageQueueService(val rabbitTemplate: RabbitTemplate) {

    /**
     * sendMessage 함수는 지정한 메시지를 "queue.tetris" 큐로 전송한다.
     */
    fun sendMessage(message: String) {
        rabbitTemplate.convertAndSend("queue.tetris", message)
    }

    /**
     * receiveMessage 함수는 "queue.tetris" 큐를 구독하여 메시지를 수신한다.
     * 메시지가 수신되면 콘솔에 출력하고, 필요한 추가 처리를 수행할 수 있다.
     */
    @RabbitListener(queues = ["queue.tetris"])
    fun receiveMessage(message: String) {
        println("메시지 수신: $message")
        // 메시지 처리 로직을 여기에 작성할 수 있다.
    }
}
위에서 만든 메시지 큐를 활용하는 Controller 를 만들어보자.
// QueueController.kt
package com.example.demo.controller

import com.example.demo.service.MessageQueueService
import org.springframework.web.bind.annotation.GetMapping
import org.springframework.web.bind.annotation.RestController

/**
 * QueueController는 메시지 큐를 통해 작업을 비동기적으로 처리하는 API를 제공
 */
@RestController
class QueueController(val messageQueueService: MessageQueueService) {

    /**
     * /queueTest 경로를 호출하면, "테트리스 블럭 이동"과 같은 작업 메시지를 큐에 전송한다.
     */
    @GetMapping("/queueTest")
    fun queueTest(): String {
        // 메시지 큐에 메시지를 전송한다.
        messageQueueService.sendMessage("테트리스 블럭 이동")
        return "메시지가 큐에 전송되었습니다!"
    }
}
사용자가 /queueTest API를 호출하면 메시지 "테트리스 블록 이동"이 RabbitMQ 큐에 전송되고, 해당 큐를 구독 중인 receiveMessage 메서드가 메시지를 수신하여 처리한다.
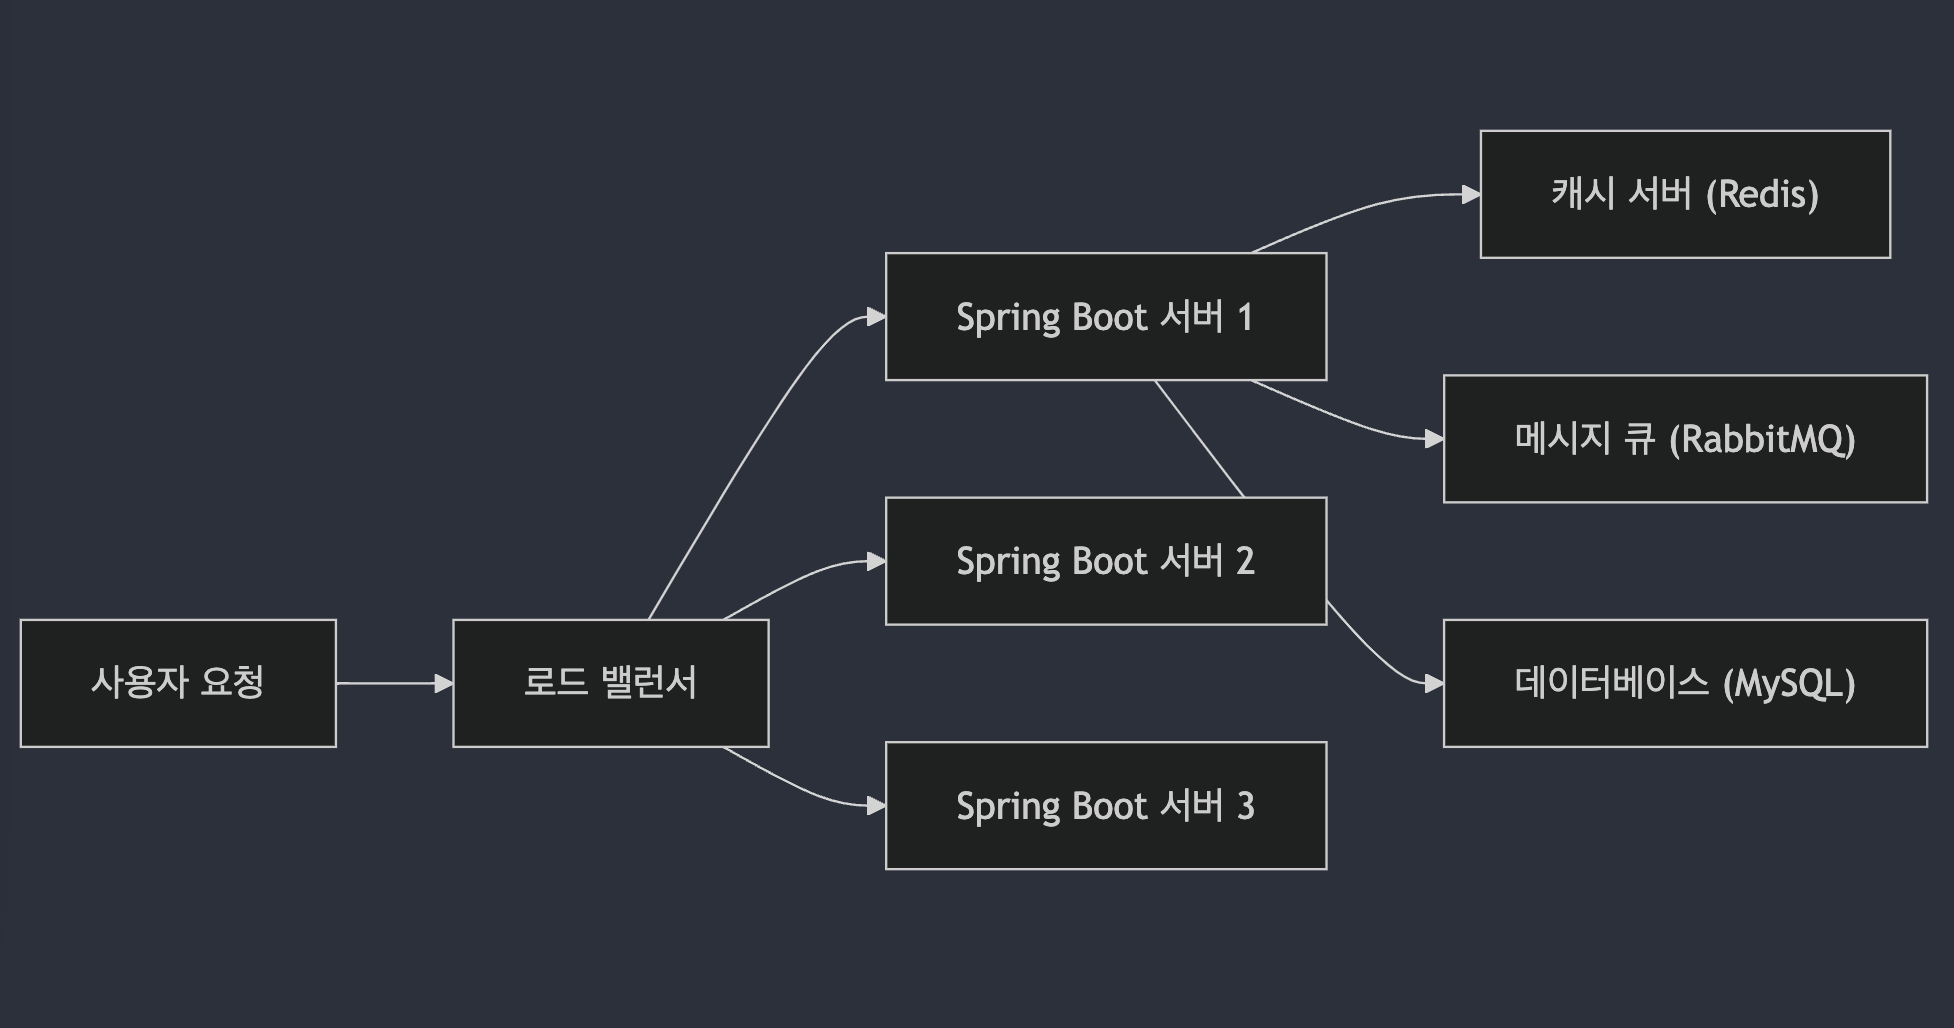
전체 아키텍쳐 다이어그램을 살펴보면
이런 식으로 표현할 수 있다. 사용자의 요청이 로드 밸런서를 통해 여러 서버에 분산되고, 각 서버는 캐싱, 비동기 처리. 메시지 큐, 데이터베이스를 활용해 안정적으로 응답을 제공하는 구조를 보여준다.